


")


 – Scale (Geoffrey West)")
 – Jóga")


 – Cyanobakterie a první fotosyntéza")
 – První prokaryota, metanogeny a strom života")
 – Vznik života – RNA svět a mineralogická katalýza")


Last month GoPro announced a handful of new mounts, three of which were focused on cycling. This would actually be the first time that GoPro has directly released a bike-specific mount (let alone three of them). In the past, they had mounts that worked for cycling (kinda), but they weren’t actually designed for mounting to a bike. Instead, they were designed for any roundish object, be it a handlebar, a stripper pole, or pogo stick.
And that’s fine, after all – versatility and flexibility is the name of the game when running a massive international logistics operation. But at the same time, sometimes specificity fits better. Plus, if designed right (such as the new handlebar mount), you can still use it for other uses and get some pretty cool shots. And that’s what they did here with the new handlebar mount that can rotate in numerous directions. They made something that’s actually unique in the market and specific to cycling. Yet it still can work elsewhere.
I’ll dive into both the new handlebar mount, as well as the new saddle mount. Both of which I’ve been using for about 2-3 weeks now. I won’t be covering the new side-helmet mount, as it’s not 100% cycling specific. Plus, GoPro didn’t send it in the box to try out.
Speaking of which, GoPro sent these mounts over for me to trial. Once done, as usual, I’ll toss them back in a box and ship them back to California. All of the actual GoPro’s used on the mounts are mine that I’ve bought. As is the bike and my awesome jersey, and everything else you see….just to be clear.
A Video Overview:
What’s that? Text not your thing? No problem – for those that want to skip this review, I’ve got almost all the same goodness in a single 6 minute long video. Though, I don’t cover unboxing. But…given it’s the shortest unboxing experience ever, I don’t think you’ll be missing out too much there. Here ya go – complete in 4K awesomeness!
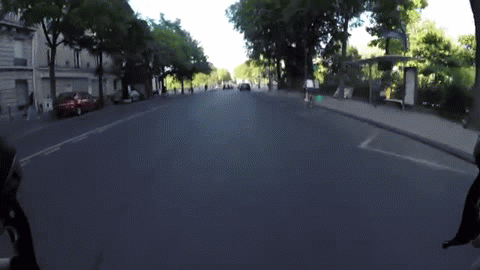
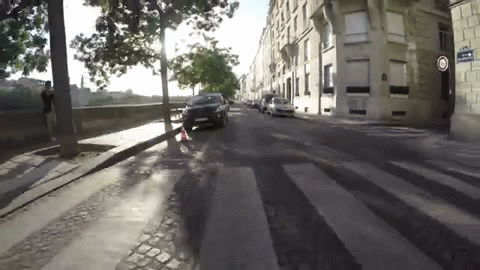
All the shots seen in that video from the bike were taken using GoPro Hero4 Black, shot in 4K/30p (attached to either of the two mounts). Most shots were on cobbles, and the video was *not* stabilized afterwards in software. Thus, you’ll see slightly more bumpiness there than you might on beautiful flat pavement. And that’s also normal for any mounts on cobbles. But that’s OK, testing across all conditions is the name of the game.
And below is a quick and fun little edit using just those two mounts:
Again, no stabilization in software was used.
In the boxes:

The two mounts come in two different packages, as they are two different products. First up is the GoPro handlebar mount, and then after I’ll cover the saddle rail mount.
After removing the clear plastic shell containing the handlebar mount, you’ve got this pile of parts:

This gives you: The handlebar mount itself, four additional spacers, a small hex wrench for adjustment, a baggie for the extra spacers, and a tiny paper manual.
The four additional spacers combine with the fifth spacer located in the unit already. These allow you to use it with a large number of different sized bars (round-only, not aerobars). The upside to this is that you’ve got lots of options. The downside is that the design of the system isn’t as flexible without these. Meaning that on some other mounts on the market, you’ve got two screws that allow for near limitless up/down sizing. This requires you find the right spacer for your specific bar.

You’ve also got that hex wrench to adjust all three of the bolts on the unit. And of course the manual too. I’ll cover adjustments in a little bit.

As you can see above, there isn’t much in the box – so that’ll conclude the unboxing section for the handlebar mount.
Next it’s onto the seat rail mount. Which, may be my smallest unboxing section ever. There’s precisely two items in there:

Yup, just the rail and the hex wrench.

And that’s it. For realz.
Ok, in order to keep this section from being absurdly short – here’s the weights of both. For the handlebar mount, I used the spacer that fit my road-bike, as a reference point.

Obviously a skinnier spacer might save a few grams, and a thicker spacer might cost you a gram or two. Here’s the weight of the smallest spacer, and the thickest spacer. I used the middle-child spacer on my bike, which is 6g (and the weight shown above). Else, it’ll be 40g with no spacers.


And the saddle mount weight at 35g:

Let’s move onto usage of these things.
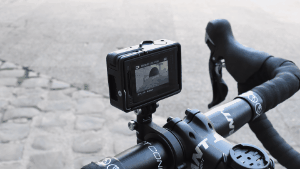
Handlebar mount:

What’s cool about the handlebar mount is its adjustability. In fact, that’s really the singular reason it’s cooler than many other GoPro handlebar mounts. See, virtually all other GoPro handlebar mounts (made by any number of companies) are designed to be mounted onto the bar and locked tightly in place. They aren’t designed to change the recording angle of the camera infinitely. But this GoPro mount is.
First, we’ll get it installed on my handlebars. You’ll need to figure out which is the right spacer to use. It actually took me about three attempts to get it right, which was slightly more than I expected. I’ve got a pretty good eye for spacers these days with doing this all the time on various bike mounts, but the GoPro ones requires you to hold it a bit firmer and then really crank it down on the spacer. So initially you might think it’s too big of a spacer, but in reality, just apply a bit more effort to close the clasp and then screw it tight.

I like to have my mount as close to the centerline as possible, and also I’d mount this first bolt resulting in the mount being flush (flat) with the ground. You can adjust it in other ways later using the other two bolts.

Once that’s done, you can go ahead and put your GoPro case on it. In my case, I’m using the GoPro Frame case, which is my favorite as it allows me to avoid having more plastic/glass on the front. Also, it allows me to charge the camera in the frame case if doing longer time lapses. Obviously, it’s not waterproof this way – though I’ve found the GoPro camera itself is more resilient to rain/water than folks give it credit for.

Once mounted you’ll notice you’ve got two additional screws/bolts. The lower of the two screws allows you to rotate it 360°, sorta like a pirouetting figure skater:

Whereas the second screw/bolt allows you to then tilt the camera up/down.

By using these two screws together, you can create magical rotations of the camera platform, as illustrated in my radical animated GIF:
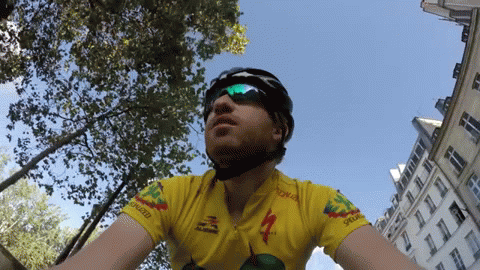
Why would you want to do this though? Well it gives you flexibility in shots. If you’ve ever edited (or even watched) footage from someone’s cycling trip, you’ll find it’s usually quite boring if it’s just a single shot facing forwards the entire time. Miles and miles of the same.
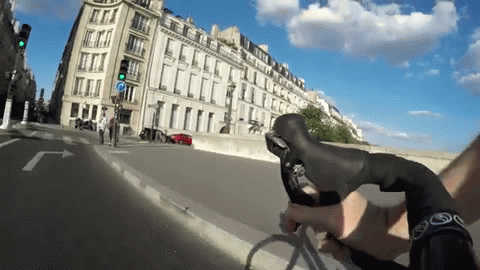
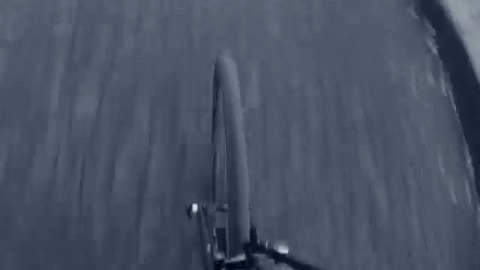
Whereas this allows you tons of flexibility in quickly moving the mount for more flexibility. For example, the selfie shot:
The brake shot:
The ground screaming past the wheel shot:
And of course just the normal forward shot:
I’ve found that if you tighten the bolt a fair bit, but not 100%, that you can still adjust it mid-ride and the mount is still stable enough to work with. But if you want, you can actually swap out the hex-required bolt for a standard GoPro thumb screw. This allows you to hand-crank it down nice and tight, but still adjust it quickly on the fly mid-ride.

With this multi-bolted design, you’ve still got some vertical stack height here though. So you’re going to get a bit more bounce than you would with a more minimal design (i.e. a K-Edge mount nice and snug). But you get more flexibility this way for more shots. Plus, I found the stability pretty good when tightened up.
Finally, note that this mount (like the saddle mount) is fully compatible with *any* GoPro compatible mounted camera. So you can pull out any GoPro in your lineup, or even non-GoPro cameras that use the GoPro mounting system (such as the Garmin VIRB X/XE, some 360° cams like the 360Fly, and others). Here’s the Hero4 Session mounted to it:

Plus, with the Hero4 Session you can use one of the frame cases to get it a bit lower profile too, as seen above.
Saddle Rail Mount:

Now of the two mounts, the saddle mount is quite frankly the least exciting. Not because it’s not well built, but just because it’s basically identical to what else is already out there. Still, I’ll give you the quick run-down of how it works.
First, you’ll start by finding your bike seat. Once that’s done, grab both the hex wrench and the saddle rail mount. You can also use a standard GoPro thumb screw if you’d like for attaching your GoPro case to the mount. That gives you more flexibility on the road. Typically it won’t impact stability as long as you tighten it properly.

Next, go ahead and open up the single bolt that separates the two pieces and slide the grooves onto your saddle rails.

You can adjust it a bit forward & backwards to find the right spot. Generally speaking it won’t matter too much, except that the rails usually start to diverge as you get closer to the back of the saddle. So there tends to be a sweet-spot on these types of mounts where it’s nice and locked in place.

You can also use any other hex wrench you have around, like I have here. I just prefer this to get a bit more torque down on the system. With this mount it is all metal, so you typically don’t have to worry about torquing down too hard.
Next, you’ll want to get your GoPro installed. Go ahead and remove the bolt that will thread through your GoPro case:

Then add your GoPro case and re-install the bolt:

At which point…donezo:

You can adjust the mount up/down a little bit depending on the exact angle you’re looking for. In general I prefer to avoid my back wheel in the shot, since that just looks awkward (it looks cool if you get something like this wheel mount however). So I try and frame it so that the back wheel is just barely out of the picture frame.
Also, in general I find that going with the wide shot (versus a medium crop) works best on a rear facing camera, since it increases the feeling of speed for objects going past you. Whereas a zoomed crop (i.e. medium crop) forces the camera zoom further down the road behind you, minimizing that feeling of speed.
In my riding with it, I’ve found the unit really darn stable. No issues with movement on it. It’s basically the same as the K-Edge mount, except that one has two bolts (K-Edge) and this one has one bolt (GoPro). But that doesn’t matter too much honestly. Both are solid options that work well.
In case you’re wondering, in this section I’m using the GoPro Blackout case with the rail mount. I like that case for the rear because it’s a bit more discrete. Plus, it just happened to be the case I already had on another mount nearby. I’m lazy that way.
My GoPro Mount Line-up:

I’ve got a lot of mounts. Drawers and drawers of them in the DCR Cave. Even more than actually fit in the drawers in fact. But despite that, I actually tend to use the same mounts over and over again. Sure, there are some kinda random specialty things that I use every once in a long while, like this egg-timer rotational mount or the wearable gimbal, but for the most part I have my go-to’s that I use day in and day out. These are also the mounts that I tend to find last forever. Whereas some cheaper mounts will often break more easily.

My go-to’s are:
GoPro 3-Way Mount: I constantly use this for on-bike shots of the bike – mostly photos actually. This is sorta like a selfie stick, but it allows you to twist it a bit more. Plus, it includes this tripod on the bottom that can also be stuck in stand/snow (just don’t leave that still in the sand, like I have once or thrice). It easily folds up and can be kept in my jersey pocket.
K-Edge Forward Mounts: There are a few different varieties of these mounts. I like the K-Edge ones because they’re machined metal, so they flex less, which gives you more stable footage. They’ve got a newish GoPro/Garmin combo mount, as does Barfly (and Garmin themselves). The main difference though is that K-Edge’s are metal, and the others are plastic, so they have more give and thus aren’t producing as stable footage.
K-Edge or GoPro Saddle Mounts: I’ve long used the K-Edge rear-facing saddle mounts, simply because they were about the only ones out there made of metal. I’ll continue to use them as I have a large stash of them (at least one per bike). The GoPro mounts are equally as good. Both cost $39. The singular advantage to the K-Edge mount is if you have other non-GoPro cameras that use a tripod style mount, you can add an attachment accessory for that (that’s also metal).
Feiyu Tech Handheld Gimbal: When I’m shooting something on a bike to demonstrate a product (like a bike computer), I’m almost always going to shoot with this gimbal (section in one of my related reviews here). The reason is that it gives silky smooth footage and is still easy to stuff in my jersey pocket.
GoPro Hero4 Silver: And of course, the action cam itself. I certainly have the Hero4 Black’s, and use them too from time to time (such as if/when I want to match 4K footage on something). But by and large I use the Hero4 Silver, simply so I can use the screen to see what I’m filming. My in-depth review of it is here.
GoPro Frame Case: This is the super-thin case that I have that doesn’t have any water protection. But it’s great for just general use and has minimal bulk.
Note that while I certainly have the chest mount, helmet mounts and all sorts of stuff – I don’t tend to use them a ton. More just specialty uses when I’m trying to demonstrate something. The one exception in cycling is that the chest mount with a wide shot (showing your arms) can be pretty cool while descending, since again it gives this impression of speed. And of course, I’ll likely use the new handlebar mount from time to time, as it fits in with whatever video I’m trying to shoot. For example, if I’m up in the mountains – that’d be a great place for some cool shots with it from different angles.
Here’s a simple table of them all:
| ‘DCR GoPro Gear’ compatible | Street Price / Price | Amazon Link | Clever Training Link (Save 10% with DCR10MHD) | More Info / Review |
|---|---|---|---|---|
| Copyright DC Rainmaker – Updated August 11th, 2016 @ 12:05 pm | ||||
| GoPro Seat/Saddle Rail Mount | $39 | Link | Link | Link |
| GoPro Frame Case | $39 | Link | Link | N/A |
| K-Edge GoPro Saddle Mount | $39 | Link | N/A | N/A |
| K-Edge Garmin/GoPro Combo Out-Front Mount (Cycling) | $45 | Link | N/A | Link |
| Feiyu Tech G4 3-Axis Handheld Gimbal for GoPro Hero4/3+/3 | $209 | Link | Link | Link |
| GoPro Hero4 Silver | $399 | Link | Link | Link |
| GoPro 3-Way Grip/Arm/Tripod | $69 | Link | Link | Link |
| GoPro Blackout Housing | $30 | Link | Link | N/A |
| GoPro Handlebar/Seatpost/Pole Mount | $8 | Link | Link | Link |
Wrap-up:

Overall I’m impressed with the GoPro’s new handlebar mount. It gives you a ton of creative flexibility on the bike, and the price is pretty reasonable compared to other higher-quality mounts on the market. Plus, you can use it for more than just cycling as long as you’ve got a pole-like object to attach it too.
As noted in the previous section, you’ll want to decide which mount is best for you. I really like the combo mounts, especially if you have a bike computer that’s supported on a combo mount (both Barfly and K-Edge make a wide selection of combo mount adapters for different bike computers). But at the same time, these forward-only mounts aren’t at all flexible in terms of different shots. So if you’re looking to add more creativity in your videos, then the GoPro handlebar mount is the way to go.
On the bike seat rail mount, I find it more as just another option on the market. It’s not really unique in any way, and it’s at the same price as the K-Edge mounts. Both work great and are stable, so just go with whatever you find a better deal on.
No matter which bike mount you choose though (GoPro or otherwise), it’s great to see GoPro paying more attention to the cycling segment. Obviously that started last year with their sponsorship of Velon, which was effectively giving them sidebar sponsorship to the Tour de France. That then continued this year as well, getting more and more action cameras into the peloton and the grand tours in general. Hopefully as we go forward that’ll extend to their action cam lineup in terms of making it easier for cyclists to show cycling-specific information on their videos.
With that – thanks for reading!
P.S. – If you’re looking for my actual GoPro action cam reviews, you’ll find the Hero4 Silver/Black review here, and my Hero4 Session review here.
Found this review useful? Or just want to save 10%? Here’s how:


Hopefully you found this review useful. At the end of the day, I’m an athlete just like you looking for the most detail possible on a new purchase – so my review is written from the standpoint of how I used the device. The reviews generally take a lot of hours to put together, so it’s a fair bit of work (and labor of love). As you probably noticed by looking below, I also take time to answer all the questions posted in the comments – and there’s quite a bit of detail in there as well.
I’ve partnered with Clever Training to offer all DC Rainmaker readers exclusive benefits on all products purchased. You can read more about the benefits of this partnership here. You can pickup the GoPro units through Clever Training using the links below. By doing so, you not only support the site (and all the work I do here) – but you also get to enjoy the significant partnership benefits that are just for DC Rainmaker readers. And, if your order ends up more than $75, you get free US shipping as well.
GoPro Handlebar Mount
GoPro Saddle Rail Mount
Additionally, you can also use Amazon to purchase the GoPro units or accessories (though, no discount). Or, anything else you pickup on Amazon helps support the site as well (socks, laundry detergent, cowbells). If you’re outside the US, I’ve got links to all of the major individual country Amazon stores on the sidebar towards the top.
Thanks for reading! And as always, feel free to post comments or questions in the comments section below, I’ll be happy to try and answer them as quickly as possible.

