


")


 – Scale (Geoffrey West)")
 – Jóga")


 – Vznik života – RNA svět a mineralogická katalýza")
 – Banded Iron Formations a raná mineralogická diverzifikace")
 – Vznik kontinentů a TTG hornin – šedá Země")
 – Vznik oceánů a hydrosféry – modrá Země")


I’m always on the lookout for a better way to capture cool footage while out running, cycling, swimming, hiking, or doing whatever the heck it is I’m doing. Be that a better GoPro or a better way to get a unique shot, there’s always room for improvement.
Over the past few years we’ve seen drones become one way for folks in sport to get those shots, either autonomously or manually. Each has their place in life, though I eagerly await the day and product that can quietly, safely, and cinematically pull together an automated edit/movie of an epic downhill mountain bike ride or skiing run. But we are getting closer and closer to that.
Part of those requirements is getting a unit that’s small enough to be easy to carry in any scenario, and while the DJI Mavic last year seemed to fit that bill – it’s got nothing on the Spark this year from a portability standpoint. Thus I was eager to put it through its paces see how well the automated tracking modes (theoretically ideal for sport) handled here compared to that. Plus, I wanted to see how it handled in general when taking it with me for a ride just as an extra long selfie-stick of sorts.
Note that in this case DJI sent me a media loaner Spark to try out, though I had already purchased my own when they went on sale. Simply the timing of the loaner Spark came prior to my paid one showing up (which has since arrived). As always, I’ll send back the loaner to DJI…at least once I figure out how to get FedEx to pick it up from this remote AirBNB on a small Italian island. In any case, let’s begin!
Size Comparison:
Normally I start off with an unboxing section, but in this case my unit I paid for is sitting at home, two days removed from me out on a trip. So I’ll add in a proper unboxing section mid-week when I return. Whereas the demo unit I got was skimmed down to just the carrying case to save on last minute shipping. No worries, we can still talk size comparisons now since I brought my Mavic with me as well.

In some ways, many of the size comparisons don’t really do it justice. At first I thought to myself, it’s really about the same size all folded up (top-down), so is it really saving me that much space? But then you’ve got to look at the thickness of it:


Heck, it’s not much different than my iPhone (iPhone 7)

And that’s where things just begin. After that, you look at weight. With the battery the Mavic comes in at 734g, while the Spark comes in at 300g. That’s just massive when you’re looking at carrying something lightweight.
The same goes for the batteries as well. Here’s how the two batteries compare:

The Mavic batteries weigh 240g, while the Spark’s weigh 95g. Essentially, just the Mavic battery alone weighs almost that of the entire Spark aircraft (including the battery). And for context, the Spark’s battery is slightly smaller than an egg in height, but slightly larger in length:


And as I’ll show later on, all this smallness in size means it’s ideal for carrying with you while out doing some sort of sport/activity – be it cycling, cross-country skiing, hiking, or whatever the heck it is you’re doing.
The Basics:

First up is the exterior of the unit. The battery attaches to the back of the Spark, which contains a button for powering on the Spark as well as performing other tasks like pairing the remote, gesture control, or checking the battery status.

These batteries are rated to last up to 16 minutes each, and I’ve found that pretty accurate. The SD card slot and micro-USB charging port sit adjacent to the battery, where it says ‘Spark’. This is notable because previously on other drones you couldn’t charge batteries via the micro-USB port. With the batteries being 1480mAh, you could easily charge it almost 7 times over with a small 10,000mAh USB battery pack. The remote’s battery has lasted me at last 6-8 flights between charges, far longer than the ~4 flights I’d get out of the Mavic’s remote.
Meanwhile, you’ll notice the props are on the unit and generally stay installed at all times, they fold up when not in use and automatically deploy outbound on take-off. You can swap out the props easily though, in the event you break them. As a general rule you’ll eventually break a pair of props, probably doing something stupid – but just as easily doing something innocent. I once broke a pair on another drone taking off when it tipped slightly and struck the ground. Props are cheap, and having them easily swappable and available when you need them is key.

Next, with the Spark you’ve got two options for controlling it. One is just to use your smartphone, and the other is to use the remote control (which costs extra, unless you buy the combo bundle). With the smartphone you’re limited to a range of 100m, whereas with the remote you’re limited to a theoretical 2KM (2,000m). Of course, you’ll have to layer in your local laws/etc on that one.

The Spark remote is a bit of a dumbed down version of the Mavic remote. For example, on the Spark remote you won’t find the exposure wheel on the back, nor the two custom function buttons (only one). Also, you won’t find the LCD display screen on it either. Just a battery indicator.


(Spark on top on both pictures, Mavic on bottom)
Still, it works just fine. Unlike the Mavic, it doesn’t use a cabled connection to your phone, but rather uses WiFi to your phone. You can, however, connect it with a cable to your phone if you get creative (some people have), which can help some issues some have seen with signal quality.
When the Spark is paired to your phone (sans-remote), it’s in a shorter-range WiFi configuration (that’s limited to 100m), but when you pair it to the remote, then it’s in a much longer range WiFi configuration where the Spark talks to the remote, and then your phone also talks to the remote – getting you up to 2 kilometers.
Unlike the Mavic however, the Spark doesn’t have a simple switch for swapping between modes. Instead, you have to hold down the rear of the unit and pair/de-pair, which isn’t quite as clean as the Mavic. Not hard, but just not as silly simple. With it being so easy to fly with the phone on the Spark, I wish it were a bit cleaner to swap between the connectivity control modes.
With everything all setup you’ll need the DJI GO 4 app on your phone. That’s the app for all of DJI’s most recent drones, including the Spark, Phantom 4 Pro, and Mavic. It allows you to preview the live video feed from the drone in real-time, as well as control the drone and initiate various automated modes.


To take-off you’ll simply tap the take-off icon, or you can use the controller stick combination to start the motors and take off manually. Once in the air and close to the ground it’ll use the Spark’s downwards facing optical flow technology to maintain position over a precise spot on the ground. It’s pretty impressive, though be aware it has troubles with reflective/moving surfaces like water or glass. So just be careful there.
You can use the two circles on the remote to control the direction of travel (up/down and rotation, left/right/forward/back).

Up higher in the air it’ll use a combination of GPS, compass, and a barometric altimeter to keep its position, which it does well. Meanwhile, the gimbal will keep the camera perfectly stable. With the Spark, the unit contains only a two-axis gimbal, and not a three-axis gimbal of the higher end DJI drones. So DJI compensates for that by stabilizing the video image in software. The stabilization result is virtually indistinguishable in most cases from that of the Mavic.

To change the direction of the gimbal (which controls the camera), you can use the gimbal wheel on the back of the remote, or with your phone you can tap the screen’s up/down arrows. Additionally, you can use the Gimbal Pitch Tracking, which uses the accelerometer in your phone to change the pitch of the gimbal as you tilt up/down. I actually found I could get really smooth shots this way, almost even more so than the gimbal wheel since it’s a bit more intuitive (despite using a gimbal wheel for years).
Next, to take a photo you can tap the photo button on the remote. Similarly, to start recording video you can tap the video record button on the other side of the remote. If using the phone, these are simply on the screen to tap. You can see in the below photo that it’s recording (and has been for 1 min and 22 seconds), and that I can switch it to photo mode using the toggle above the recording button.

Note that unlike the GoPro Karma drone, you cannot take a photo at the same time as video, which is definitely a bit of a letdown. I really wish it would even just take a snap of the video at that point in time, even if at a lower resolution. Shame. You have to end the video session and then take a photo.
I dive into the photo modes in a bit more detail later on, so we’ll get back to that shortly. However, there are some autonomous flying modes, which are dubbed ‘Intelligent Flight Modes’ by DJI. These modes make it easier to get good camera shots/movements if you don’t have the drone skills to pull them off manually. Within the Spark, there are these core flying modes:
A) Normal: Just regular control of drone
B) Quickshot: Four additional drone video movements
C) Active Track: Tracking an object as it moves (Full section on this later)
D) Tap Fly: Flying to wherever you tap
E) Tripod: Keeps the drone super-stable for longer exposures
F) Gesture: Allows you to control drone functions with your hand
The Quickshot features are most notable here, as they expand out into four categories:
A) Rocket: Goes straight up while pointing camera downwards
B) Dronie: Angles out and away from you, keeping camera on you
C) Circle: Rotates around an object
D) Helix: Goes upwards while rotating around an object (like Rocket + Circle combined together)
These are notable because previously DJI didn’t have these modes, which other drones like the GoPro Karma as well as 3DR’s various units actually did. It was always odd they were missing, while DJI did have other more complex features like course lock and such (those features however aren’t on the Spark).
Now in later sections I talk about performance and stability, so I’m going to skip that and briefly discuss the whole return to home/landing piece. With the Spark it’ll set the home point each time you take-off. You can update this point though if you’re moving (such as walking across a large field, thus giving you longer range). It’s this home point that’s used in the event of ‘Return to Home’ (RTH), which occurs if your phone loses signal to the Spark.
The Home Point settings option is available from the controller menu, as seen below.

When it does so, it’ll go to the predetermined elevation above the ground (I usually set it for 30m) and then fly back to you and land at wherever it took-off. Losing signal isn’t something to freak out about in most cases, it’s something of a fact of life with drones. What’s most important is how well it handles once it does lose that signal.
It’s notable that when returning to home automatically it’ll leverage the forward facing obstacle avoidance to avoid running into things (such as trees). This generally works well for most DJI products in the summer, but is less dependable in the winter when there’s no leaves on the trees and the avoidance algorithms can have trouble picking up thin braches. Still, it works well this time of year. You can see below the avoidance picking me up and listing my distance away. The unit will stop and will not fly into me, no matter how much forward stick I give it.

Note that unlike the Phantom 4 Pro, this doesn’t have obstacle avoidance on all sides, so it can still run into something if you fly it backwards – so do be careful on that. Same goes for going upwards into something, which is where almost all of my drone to object incidents have occurred. For example if flying below tree cover and you run into a signal issue – it’ll ascend upwards…directly into that tree, during RTH. So you wanna be careful in those scenarios. Though, I’ve been lucky enough with the Spark to avoid that from occurring.
Finally, I want to very briefly mention Gesture control mode. In this mode you can fly the Spark without any controller or phone at all. You simply hold the unit out in your hand and double-tap the back of it, which will take off and then allow some very basic control and taking a photo (but no video). My father-in-law was able to control it fairly well, without ever flying or touching a drone before.

While this mode makes for good marketing and press, I just don’t find it super-awesome. It’s kinda clumsy to use, and really isn’t any faster than just taking out my cell-phone and controlling it that way. Further, the accuracy of the gestures is at best questionable. Sometimes it gets it…sometimes not. To me this is mostly just a gimmick, though still a bit of a technically impressive one. There are however some very useful suggestions in this thread where DJI has solicited feedback on how to improve it. Hopefully they take some of those to heart.
With that, we’ve covered all the basics of the unit. Note that all your photos and videos are copied in real-time to your phone, so even if you kill your drone 90% the way through your flight and lose it to the ocean, the photos and videos you took are available on your phone to remember your drone by.
Video & Photo Modes:

Unlike other DJI products, the video and photo modes/options on the Spark are exceedingly simple. There is precisely one video mode/resolution, and one photo resolution. However, there are multiple photo modes – which I’ll get into in a second.
On the video side, if you go into the settings menu, you’ll see the singular mode – for just 1080P/30FPS. Normally on other DJI drones you’ve got many more options for frame rates, resolutions, and recording formats/styles.

What’s interesting here is that while the Spark only records 1080p, the imaging sensor is “almost identical’ to that of the DJI Mavic, according to discussions with DJI. However, unlike the Mavic which has a three axis gimbal – the Spark only has a two-axis gimbal. So they use the extra resolution (likely 4K resolution) to provide what is essentially a virtual third axis gimbal for stabilization. In essence doing what GoPro, Garmin, and others do with their action cameras and electronic image stabilization.
Now while you only get a single video resolution to work with, you can tweak some basic settings including ISO, shutter speed and exposure. However, unlike the Mavic, there is no dedicated exposure wheel on the back of the remote, which I’ve found super-handy on the Mavic when filming in challenging lighting conditions (like in mountains where you get into bright/shady spots quickly). Still, in general, the Spark handles this quite well in automatic mode.

You’ve also got the ability to change the white balance as well as overlay grids, a histogram, and an OSD display. These options are all similar to what you see on DJI’s other products as well.

Next, shifting to photo mode – you get a number more options here. You’ve got the basic single shot option, but also multiple shots, AEB (basically an HDR shot), timed shots (i.e. a timer delay), shallow focus, and pano modes. Within pano you can do both vertical and horizontal pano.

Here’s an example of the timed shot settings page. This is useful if you want to press the button and then stash the remote out of view while you arrange yourself for that perfect epic shot.

Meanwhile, Pano is actually kinda interesting how it works. It takes 9 different photos automatically for you. Unlike pano modes on some hand-held cameras, this doesn’t require your input at all. You hit go, and you can see the drone moving slightly in the air to get the pano shot. In fact, if you look later on at the SD card, you get these 9 shots individually:

Plus, the actual compiled pano shot as well, which is exported/compiled manually from the DJI GO App on your phone:

You can notice above that it underexposes the shadows a bit more than I’d have liked. This is easily fixed in any photo app in about 2-3 seconds, but still, worthwhile noting as it’s a bit of a consistent theme I’ve seen with the Spark and photos.
In fact, it does the exact same thing for Shallow Focus photos (making a blur effect), where it takes 16 photos (+ 1 compiled photo that you have to export from the app):

And the resulting photo which has the shallow depth of field, which also must be exported manually from the DJI GO app on your phone:

You can access any of the images/videos from the DJI Go app at any point in time, both the low-res versions without connectivity to the drone, or download the higher resolutions versions afterwards.

You can also create automated movies that in theory pull together a highlights real of your flight/day. But in reality, I found it not quite as smart at GoPro’s automated movies they do (which still isn’t super smart either). So things are getting better, but you’re better off doing your own video edits.
As for the overall quality, I’ve had no issues with the quality of the video or photos of the Spark. They are exceedingly sharp, with well-balanced colors (although slightly underexposed in shadows of photos in some cases). I’ve included a bunch of the video footage in my other Spark videos.
I suspect the reason the quality is so good is due to the aforementioned nearly identical imaging setup to that of the Mavic, just without the ability to record at higher resolutions like 4K or higher frame rates. To me this leaves open the door for where DJI will bring a Gen2 version of the Spark, as you would expect with any company iterating on products.
For photos, here’s a small gallery of photos from the unit. These are straight off the card, all automatic, and no correction in any way.

Note that the Spark only has a single photo format – which is .JPG. Also note that while the content recorded to the SD card is 1080P/30FPS for video (.MP4), and 12MP for photos (3936×2976), the copy of the imagery sent to your phone live is actually less. For that, it sits at 720p & 1024px. You can, of course, download the original full resolution version using the app as well.
Performance & Stability:
One of the core things that often separates DJI products from other drones on the market is stability. Not just how smooth a gimbal is, but more around how well it handles in the air. Can it maintain position (vertical and horizontal) for long periods of time in heavy winds? Can it return to exactly where it took-off in RTH (Return to Home)? And how does it handle from a controls standpoint.
When it first comes to positioning, the unit contains GPS, a barometric altimeter, and downward facing optical flow sensors to detect the ground at close range. All of this helps it to keep precisely where it was placed last in the air, be it a few feet above the ground, or at 100ft above the ground. While this may sound trivial, if you follow the drone industry you’ll know it can often be a challenge. GoPro’s Karma drone for example can’t hold its spot in the air with any degree of accuracy, especially closer to the ground or trees when you need it most.
To demonstrate this positioning a bit, I went ahead and found myself some high winds and then plunked both the DJI Spark and the DJI Mavic into the air. Here’s the results:

As you can see, it handled very well. Even in sport mode, no issues at all.
But what about differences between the remote and the phone from a performance standpoint? Well, in that case we do see some pretty big differences. Of course, some of that is by design – but not all of it. In the case of using a smartphone for control, I tested with both an iPhone 6 and an iPhone 7. I didn’t see any notable differences between either of them, but I did find that in general I’d have a tough time getting beyond about 70m or so – line of sight with nothing in between. The unit is rated at 100m range with the WiFi from your phone. Below, at 58m, I lost contact.

Meanwhile, using the remote, I got mixed results. In some cases (referring to easy line of sight here) I had really good results, getting much better range into the hundreds of meters before I’d hit local regulation limits (it’s rated for 2,000m). Yet other times I’d have issues at a mere 60-80m. No explanation for why it was great one time, and less so another.
Similarly, I found the signal much more susceptible to blockages (such as a mere tree) than the Mavic or Phantom units, easily dropping connectivity with the slightest item in the way. This is true of both the video feed as well as the control feed. This is likely the result of different technologies being used. With the Spark, it uses a long-range WiFi variant for both, whereas with the Mavic it uses Lightbridge and with the Phantom 4 Pro it uses OcuSync.

Next, battery life. The Spark claims 16 minutes of battery life, and the unit easily hits that over and over again. I did numerous tests down to the point of forced landings (a few percent left), and all of them were in the 14-16 minute marker. Historically speaking DJI has been really good here in terms of hitting their claimed battery life numbers, an area that again many other drone manufacturers seem to fudge a bit.
Finally, as for returning to home correctly – I did numerous tests here and it always returned back to its starting place within about 1-2ft, often within a a single foot.
Overall while I am occasionally frustrated with the range/signal issues, I find the remaining aspects of performance quite good. For the range and signal issues, with this particular unit and how I would use it (quicker shots at usually closer range) – the range piece isn’t as critical. Still, like having a long runway – it’s always better to have a cushion than not. And I wish the cushion here worked a bit better.
Sport/Athletic Usefulness:

Of course, most readers to this site are of the athletic mindset. And as such, you’re probably wondering how to use the Spark to track your sport awesomeness. For that I give you two options. First, is you can just watch the below video and skip over this section (I recommend it, it’s got cool music). Or second, you can read this section. Your choice (but again, I spent at least 3 minutes picking out the audio tracks).
So you wanted to read text instead? Ok, let’s begin.
With the Spark, it contains only one of DJI’s two different tracking modes: Active Track (but not Follow-Me). Active Track means that the Spark can recognize a given object (a runner, cyclist, etc…), and then track that option using its camera. Whereas Follow-Me (on the DJI Mavic, Phantom, etc…) follows the GPS position of the remote control. But the Spark does not have Follow-Me, only Active Track.
To setup Active Track you’ll tap the intelligent flight modes option on the left side of the controller (the remote controller icon). That brings you to this menu:

You’ll see Active Track listed on the right side, which you’ll go ahead and tap.

Once you’ve done so you’ll then want to tap the object you want to track. This can be anything from a cyclist to a runner, a golf cart to a tree. Yes, it’ll let you track a tree. Not very well, but at least it’s flexible. As you might surmise – it doesn’t much care what type of object your tracking, but rather that it’s something it recognizes as being an object.

Once you’ve tapped it or drawn a square around it, it’ll illuminate green with the ‘Go’ next to it. You do need to tap ‘Go’ in order to start.

Below you as the tracked object you’ll see a little dial that lets you rotate the camera, from 0 to 100%, in either direction. The % controls the speed at which the camera rotates around you in an orbit. In general I find about 20-30% the most successful for any moving object. Beyond that it seems to lag too much and doesn’t usually catch up correctly. Whereas if you’re atop a mountain standing there, then sliding it up to 100% helps get a quicker shot.

Note that the Spark has two modes for Active Track – Trace and Profile. In Trace, it’ll loop around you (or follow from front or behind), as seen above. In profile, it’ll follow you from a fixed angle, such as the side.
Now there are a small pile of limitations to be aware of here with Active Track. They are:
A) You’re limited to 100m from the take-off point: With the remote, you don’t have this limitation (it’s 8,000m from take-off point).
B) You’re limited to a 12m/s (26MPH/42KPH), any faster and you’ll eventually lose the unit
C) If you disappear from camera view, you’ll lose tracking (unless it’s just for a split second, and even that’s iffy)
D) You can’t lock the screen on the phone (or controls on remote), so you’ll need to keep that open/available
E) There is no follow-me mode. It doesn’t follow the controller’s position, just you on the camera.
Got all that? Good.
So where does it leave us? Well, it depends. The tracking mode in the Spark, unlike that of the Mavic and other DJI drones, isn’t super great for doing solo shooting of yourself in sports. For example, you certainly couldn’t go for a bike ride with it and expect it to follow you for any considerable length of time, even if you did use the controller. A few hundred meters sure, but eventually you’ll go under a tree or similar – and it’d lose you. Then you’d have to frantically work to reset the home point so it didn’t fly back to wherever you were under.
On the flip-side, it can be more useful if you’ve got a friend to control the drone but then use the Active Track features to get better camera work. Also, it is useful for sports/cases where you’re in a relatively compact locale. For example my snippets of climbing up some rocks in my video above – all that works quite well here.
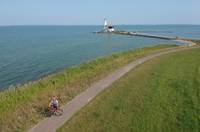
In many ways though, what’s more useful about the Spark in sport isn’t using the Active Tracking features, but rather just taking it with you. I’m able to very easily fit it into my cycling jersey pocket, either with two props sticking out, or with the entire thing in a cycle pocket. It feels less bulky than a water bottle does there.


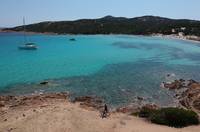
And then that allows me to just stop along the side of the road at somewhere scenic, and get a photo in a place like this in a minute or two, then keep going:

Ultimately though, I just keep wishing that DJI would release a small transmitter pod like Airdog has, that would transmit my location/altitude, and allow some basics controls of the drone. I’d pay hundreds for such an accessory – especially if it was more or less guaranteed to work with any of DJI’s drones (à la their Goggles), allowing me to use it from purchase to purchase.
Accessories & Combo Packages:
As with most DJI products, there are various combo packages you can purchase. Longtime readers know I generally dislike combo packages, since in most cases I find them basically just upsells to get you to buy things you probably don’t need. But with the Spark, like the Mavic, I do actually recommend the combo packages.
With the Spark the notable extras here would be the the battery charging station (an extra battery for a total of two batteries), as well as the remote. Sure, you also get a shoulder bag and case and prop guards – but let’s be honest, almost nobody uses the prop guards. But you do get a full extra set of props, which you’ll undoubtedly need at some point. I always carry an extra set or three with me when travelling.

And like the Mavic, the charging station works exceptionally well. It can charge up to three batteries on it, as well as has two USB ports for charging other things – like your phone and the remote itself.

And of course – you get the remote. For this drone if you plan to fly it anywhere beyond 80m or so, you’re going to need the remote (remember, it’s hard-set to a 100m limit, the 80m limit is my realistic range that I’m seeing). If you plan just super quick selfie-style shots, you’ll be fine without the remote. But if you want to get a few hundred meters out, then you’re going to need the remote.
Given it’s only $200 more to get the extra battery, remote, charging station, an extra set of props, and other stuff you won’t use, it’s worthwhile in my opinion.
Product Comparison:

I’ve added the DJI Spark into the product comparison tool within the drones section. Within it you’ll find a comparison to the GoPro Karma drone, DJI Mavic, and Airdog. Essentially, all the other drones I’ve written reviews/posts on.
| Function/Feature | DJI Spark | GoPro Karma Drone | DJI Mavic Pro | Airdog |
|---|---|---|---|---|
| Copyright DC Rainmaker – Updated June 26th, 2017 @ 12:30 pmNew Window Expand table for more results | ||||
| Price (non-combo) | $499 | $799 ($999 with Hero5 Session, $1,099 Hero5 Black) | $999 | $1,599 |
| Announcement Date | May 24th, 2017 | Sept 19th, 2016 | Sept 26th, 2016 | Jun 15th, 2014 |
| Shipping Date | June 15th, 2017 | Oct 23rd, 2016 | Oct 21st, 2016 | February 2016 |
| Included | With combo | Yes (backpack) | No (In Fly More Combo Yes) | No |
| Can store props w/o removal | Yes | Yes | Yes | No |
| Weight | 300g | 1941g | 739g | 2022g |
| Folded Dimensions | 55Hx143W×143L mm | H83mm x W83mm x L198mm | ||
| Unfolded Dimensions | – | |||
| Controller | With combo | Yes | Yes | Yes |
| Use only phone as controller | Yes | No | Yes | No |
You can mix and match drones I’ve reviewed to create your own product comparison table. Note that I generally don’t add drones in that I haven’t had hands-on time with. Just the way I roll.
Summary:

In many ways, DJI is in the same position GoPro was 3-4 years ago. A point where as a company each and every new product release wowed not just regular consumers, but also techies. A given product need not necessarily be what a devout geek would buy, but something a geek could appreciate for its purpose in the world, or the boundaries it pushes within that market/segment.
And that’s kinda where I am with the Spark. For my specific uses, I initially figured that I’d use my DJI Mavic 80-90% of the time, so much so that I wouldn’t likely bring my Spark on vacation, except to places where I think flying might be more limited. My thinking being I’d want things like 4K footage and the higher end specs that the Mavic brings with it. But now actually being on such a vacation with both drones, I realized I’m really preferring to use the Spark over the Mavic. Which is not what I expected. Sure, I lose the 4K footage – but the speed to which I can get it in the air and the ease of transport is just awesome. I can toss it in a beach bag with little worry, or on a hike with little weight.
The performance and quality for the price is astounding. And further, it’d be a mistake to believe that the Spark is underpowered in every category compared to the Mavic. It’s not. Certainly some (resolution/battery being the two main ones), but there are plenty of categories where the Spark does the exact same things using the exact same software as the Mavic. This is easily now the drone I’d recommend to most of my friends who don’t yet have drones.
Still, there continues to be work that DJI as a company can focus on – namely support. Having semi-recently been through the DJI support process, even with their premium DJI Care Refresh paid service, it leaves much to be desired compared to GoPro’s non-premium and free Karma drone support. With DJI, I simply shouldn’t have to wait 2+ weeks for a replacement unit when the service center is a mere three-hour drive away. But in general, as a company they’ve come a long way in maturity in just a few short years. And when it comes to Active Tracking – it’s still not great for solo sport usage. Filler shots and such, sure, but not really as a way to create a full film with snippets of a long ski run or 15 minute ride.
But again, the Spark has easily become my go-to drone when heading out on vacation. With that, thanks for reading – and I’m back to pretending to be on vacation.
Found this review useful? Support the site! Read on!

Hopefully you found this review useful. At the end of the day, I’m an athlete just like you looking for the most detail possible on a new purchase – so my review is written from the standpoint of how I used the device. The reviews generally take a lot of hours to put together, so it’s a fair bit of work (and labor of love). As you probably noticed by looking below, I also take time to answer all the questions posted in the comments – and there’s quite a bit of detail in there as well.
If you’re a fan of Amazon, you can pickup the DJI Spark that way and it helps support the site! It doesn’t cost you anything extra, yet helps here a bunch. If you’re outside the US, it should automatically find the right Amazon country for you – but you can always use the big Amazon country links on the right sidebar if so! Oh, and in the future if you just click that Amazon logo before buying anything else (like laundry detergent or toilet paper), that supports the site too!
And of course – you can always sign-up to be a DCR Supporter! That gets you an ad-free DCR, and also makes you awesome. And being awesome is what it’s all about!
Thanks for reading! And as always, feel free to post comments or questions in the comments section below, I’ll be happy to try and answer them as quickly as possible. And lastly, if you felt this review was useful – I always appreciate feedback in the comments below. Thanks!

